前言
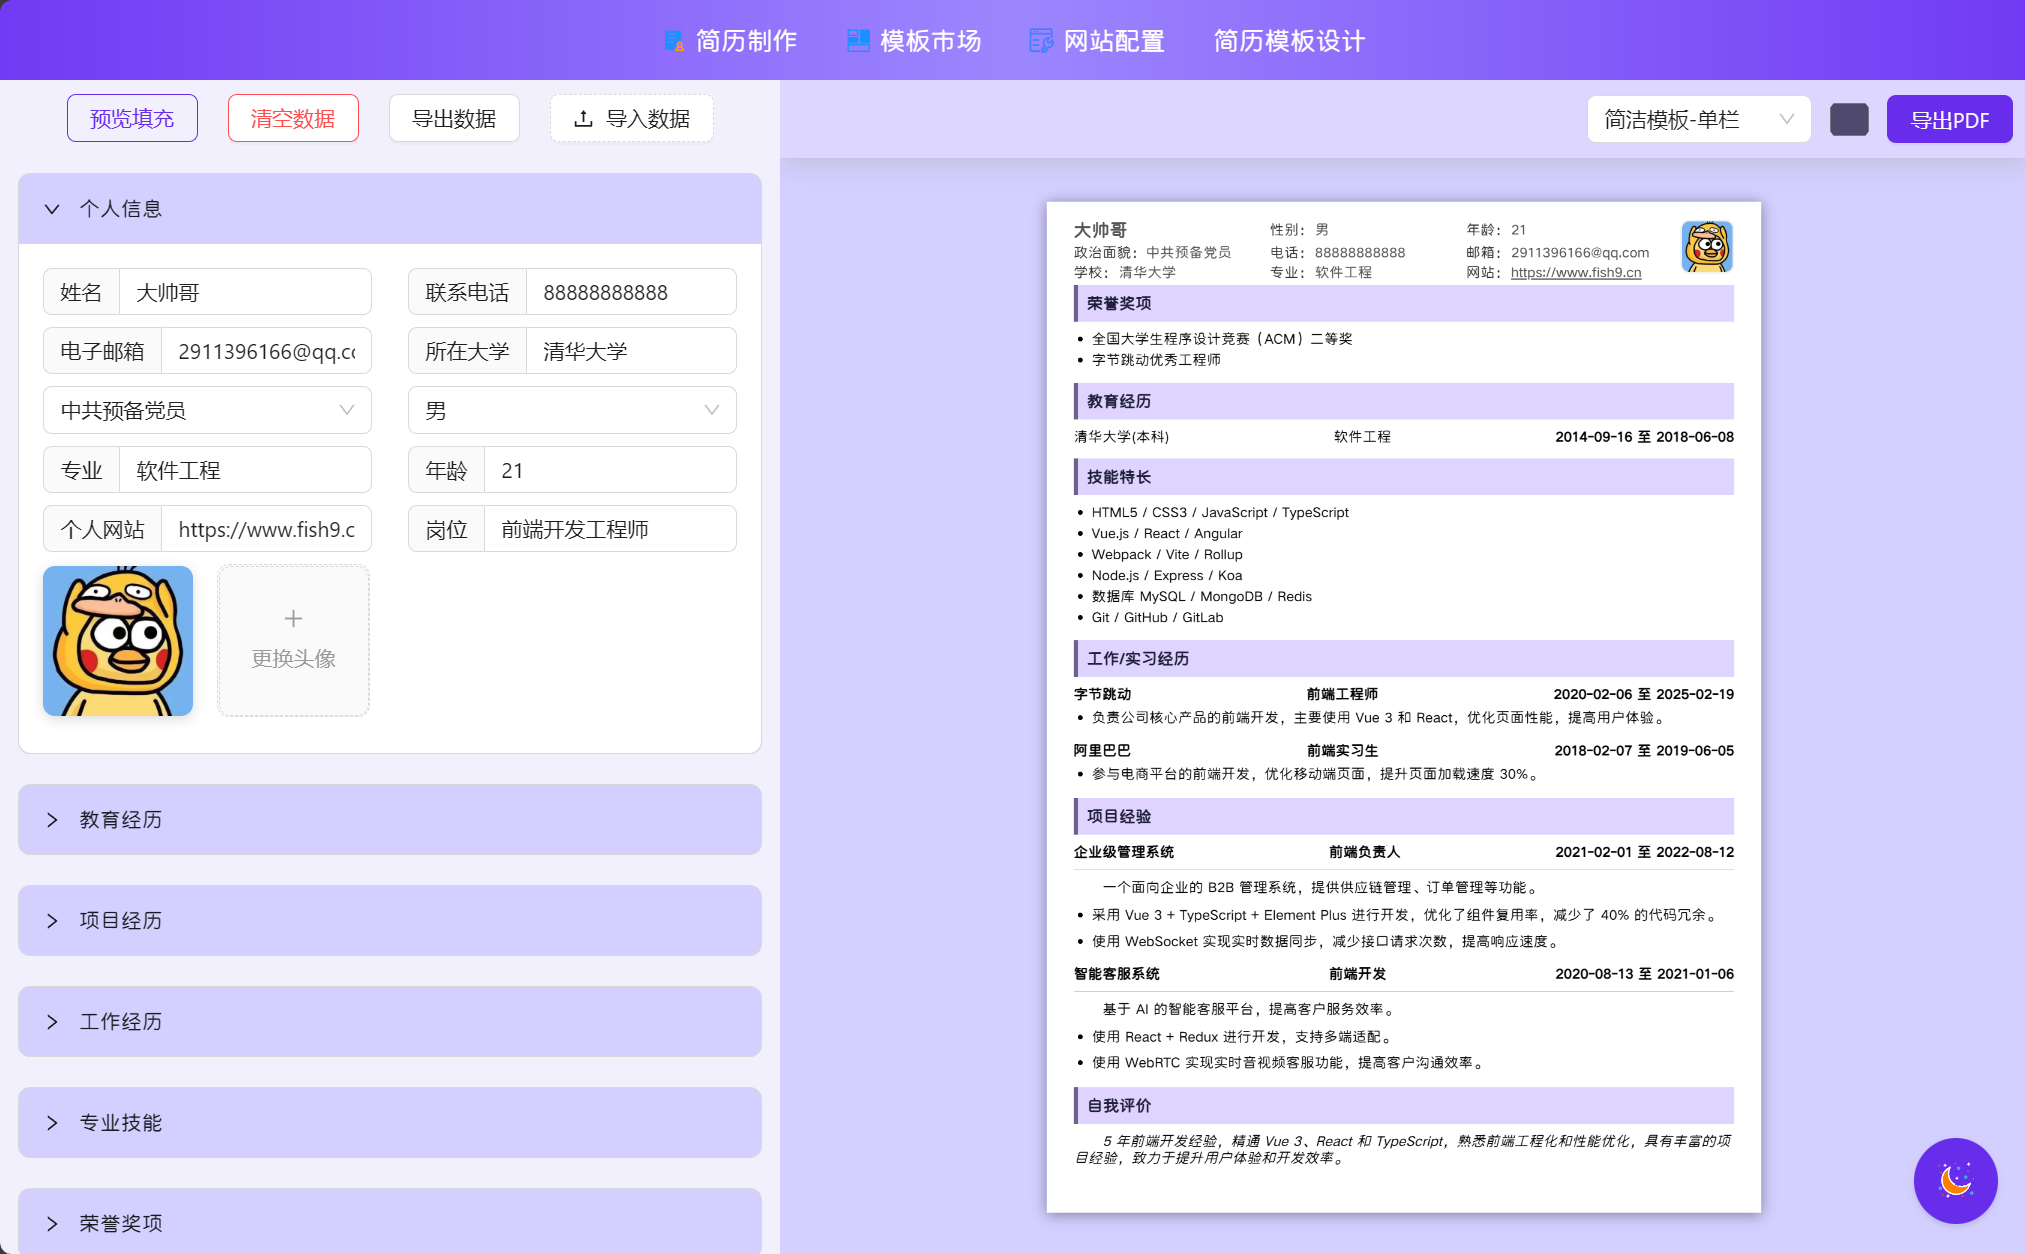
最近在做自己的一个纯前端项目,一个在线简历生成平台
项目体验地址:https://resume.404.pub
项目开源地址:https://github.com/weidong-repo/AIResume (欢迎来stars)

封装的AI润色组件(演示篇)
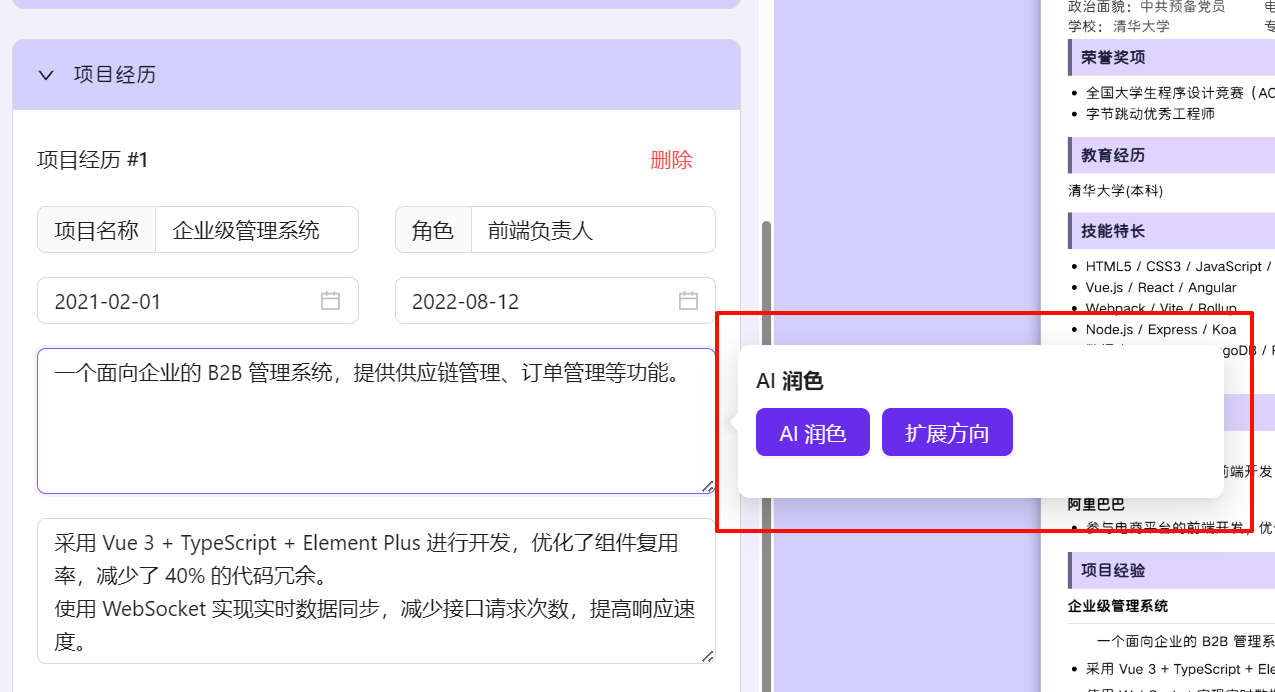
先看效果,用户编辑简历的时候,回弹出“AI润色”、“扩展方向”两个按钮,用户在输入内容后,即可使用“AI润色”相关功能

AI流式生成润色以及扩展方案

AI润色的产品构思、需求分析、前端展示规划
其实现在日益丰富的AI产品下,使用大模型来为自己的简历增添色彩已经十分常见,于是我就想,是否可以让用户边写简历,AI一边可以及时辅导润色?
针对这个需求,我开始构思功能。
需求分析:首先这个功能肯定是用户能够顺手就能用到的,呼之即来。即编写过程中,可以实时使用,亦或者说是编写完成,使用AI来使其专业化。除了AI润色,还有当编写简历的时候,可能会不知道往哪个方向扩展,这个时候,就需要使用大模型来辅助“扩展方向”,告诉用户往哪个方向扩写等。
大模型:大模型直接用阿里云的千问大模型来做(这里支持用户切换大模型,接口格式适应的是openai)。
前端展示规划:用户点击输入框的时候,右侧有弹窗,antDesign 的Popover 气泡卡片实现(需要二次封装),另外当用户点击一键插入的时候,需要把AI生成的值替换进输入框中。
实现思路:
- 首先封装一个接口,用于请求大模型、流式响应大模型返回。(用户已在网站设置了apikey等相关大模型调用信息,存储localStorage中)
- 然后二次封装
Popover,命名为AIEnhancePopover,把按钮、AI回复内容等都装进组件,调用接口后AI返回内容要在上面展示。(保留插槽) - 使用插槽,传递输入框进
AIEnhancePopover中,这样实现在不影响页面中 输入框数据的 存储变化,也可以使用到封装好的组件AIEnhancePopover,同时往AIEnhancePopover中传入不同的提示词。保留一个通信事件(供用户把AI生成内容替换进输入框)大概逻辑结构如下
<AIEnhancePopover :description="提示词" @update="(content: string) => project.briefIntroduction = content">
   <a-textarea v-model:value="project.briefIntroduction" />
</AIEnhancePopover>
接口调用qwenAPI.ts
总体流程就是拿到请求接口的信息,构建请求,发送请求,拿到流式返回的数据异步通过回调函数返回给组件,当返回结束了,回调函数传参返回结束,即表示AI回复结束。
首先拎出一些关键点来说明
fetch发送请求,构建请求参数,stream:true表示当前请求时流式请求
const requestData = {
    model: model,
    messages: [{ role: "user", content: prompt }],
    stream: true,
    stream_options: {
        include_usage: true
    }
};
获取流式响应
const reader = response.body.getReader();循环处理响应数据,当数据传递完成的时候,回调函数设置结束表示为true,结束循环。
while (true) {
      const { done, value } = await reader.read();
      if (done) break;
      const chunk = decoder.decode(value);
      const lines = chunk.split('\n').filter(line => line.trim() !== '');
      for (const line of lines) {
        if (line.startsWith('data: ')) {
          const jsonLine = line.slice(6).trim();
          if (jsonLine === '[DONE]') {
            onResponse(currentText, true);
            return;
          }
          try {
            const parsedLine = JSON.parse(jsonLine);
            if (Array.isArray(parsedLine.choices) && parsedLine.choices.length === 0) {
              continue;
            }
            const deltaContent = parsedLine?.choices?.[0]?.delta?.content;
            if (deltaContent) {
              currentText += deltaContent;
              onResponse(currentText, false);
            }
          } catch (err) {
            onResponse("解析流数据时出错,请稍后重试", true);
            console.error("解析流数据时出错:", err);
          }
        }
      }
}最后贴上完整代码qwenAPI.ts,适用于单轮问答,cv即用!
import { useSettingsStore } from "../store/useSettingsStore";
import { message } from "ant-design-vue";
//读取用户设置的API地址和API Key
const settingsStore = useSettingsStore();
export async function sendToQwenAI(prompt: string,
  onResponse: (responseText: string, isComplete: boolean) => void): Promise<void> {
   // 构建请求参数
  const API_URL = settingsStore.aliApiUrl;
  const userApiKey = settingsStore.aliApiKey;
  const model = settingsStore.modelName;
  const requestData = {
    model: model,
    messages: [{ role: "user", content: prompt }],
    stream: true,
    stream_options: {
      include_usage: true
    }
  };

  try {
    const response = await fetch(API_URL, {
      method: "POST",
      headers: {
        "Authorization": `Bearer ${userApiKey}`,
        "Content-Type": "application/json",
      },
      body: JSON.stringify(requestData),
    });

    // 返回情况检查
    if (response.status === 401) {
      onResponse("认证失败,请检查 API Key 是否正确", true);
      message.error("认证失败,请检查 API Key 是否正确");
      return;
    } else if (!response.ok) {
      onResponse(`请求失败,错误码: ${response.status}`, true);
      message.error(`请求失败,错误码: ${response.status}`);
      return;
    }
    if (!response.body) {
      onResponse("服务器未返回流数据", true);
      throw new Error("服务器未返回流数据");
    }

    const reader = response.body.getReader();
    const decoder = new TextDecoder();
    let currentText = "";
    while (true) {
      const { done, value } = await reader.read();
      if (done) break;

      const chunk = decoder.decode(value);
      const lines = chunk.split('\n').filter(line => line.trim() !== '');

      for (const line of lines) {
        if (line.startsWith('data: ')) {
          const jsonLine = line.slice(6).trim();
          if (jsonLine === '[DONE]') {
            onResponse(currentText, true);
            return;
          }
          try {
            const parsedLine = JSON.parse(jsonLine);
            if (Array.isArray(parsedLine.choices) && parsedLine.choices.length === 0) {
              continue;
            }
            const deltaContent = parsedLine?.choices?.[0]?.delta?.content;
            if (deltaContent) {
              currentText += deltaContent;
              onResponse(currentText, false);
            }
          } catch (err) {
            onResponse("解析流数据时出错,请稍后重试", true);
            console.error("解析流数据时出错:", err);
          }
        }
      }
    }
  } catch (error) {
    console.error("请求 Qwen AI 失败:", error);
    message.error("请求失败,请稍后重试");
    onResponse("请求失败,请稍后重试", true);
  }
}
组件封装AIEnhancePover
前面调用接口的请求ts已经封装好了,接下来就是对AI润色块整个部分进行封装了,这里需要进行封装按钮,发起请求,同时需要渲染展示AI的回复问答。
首先是界面部分,组件的界面是二次封装了一下ant-design的a-popover组件,简述为两个按钮以及ai回复,以及一个一键应用AI回复的按钮。还有一个插槽,供使用的时候传递a-popover组件所指向的内容。
  <a-popover :title="showTitle" trigger="click" placement="right" arrowPointAtCenter="true">
    <template #content v-if="description && description.length > 4">
      <div class="ai-controls">
        <a-button type="primary" @click="handleAiEnhance(description, false)" :loading="loading &&
          !AIextent" :disabled="loading && AIextent">
          AI 润色
        </a-button>
        <a-button type="primary" @click="extend && handleAiEnhance(extend, true)" :loading="loading && AIextent"
          :disabled="loading && !AIextent">扩展方向</a-button>
      </div>

      <div class="ai-content">
        <a-spin :spinning="loading">
          <div v-if="AIReply" class="ai-reply">
            {{ AIReply }}
            <div class="apply-button" v-if="!AIextent">
              <a-button type="link" size="small" @click="handleApply">
                <template #icon>
                  <check-outlined />
                </template>
                应用
              </a-button>
            </div>
          </div>
        </a-spin>
      </div>
    </template>

    <slot />


</a-popover>逻辑部分接受父组件传递过来的一些参数,description作为发送给ai的Prompt提示词
const props = defineProps({
  description: String,
  extend: String
});
然后就是构建好prompt,发送给已经封装好的 sendToQwenAI 即可,并且传递一个回调函数,用于更新组件中的AI回复的内容
// 发送给 AI 处理
const handleAiEnhance = async (Prompt: string, isExtend: boolean) => {
  if (!Prompt || Prompt.length < 5) return;
  AIextent.value = isExtend;
  loading.value = true;
  AIReply.value = ""; // 清空上一次的结果
  try {
    await sendToQwenAI(
      buildPrompt(Prompt),
        // 传递一个回调函数,用于更新组件中的AI回复的内容
      (text, isComplete) => {
        AIReply.value = text;
        if (isComplete) {
          loading.value = false;
        }
      }
    );
  } catch (error) {
    console.error("AI 处理失败:", error);
    AIReply.value = "AI 处理失败,请稍后再试。";
    loading.value = false;
  }
};
最后AI润色二次封装的完整代码(省略掉 CSS ,有些长...)
<script setup lang="ts">
import { defineProps, computed, ref } from "vue";
import { sendToQwenAI } from "../../../api/qwenAPI";
import { useResumeStore } from '../../../store';
import { defineEmits } from "vue";

const resumeStore = useResumeStore();
const personalInfo = computed(() => resumeStore.personalInfo);
const props = defineProps({
  description: String,
  extend: String
});

const emit = defineEmits<{
  update: [content: string]
}>();

const AIReply = ref("");
const loading = ref(false);
const AIextent = ref(false);

const showTitle = computed(() => {
  if (!props.description || props.description.length < 5) {
    return "请输入更多信息后可使用 AI 功能";
  }
  return "AI 润色";
});

// 构建 AI 提示语
const buildPrompt = (text: string) => {
  return `我现在求职的是${personalInfo.value.applicationPosition}岗位,
  ${text}`;
};

// 发送给 AI 处理
const handleAiEnhance = async (Prompt: string, isExtend: boolean) => {
  if (!Prompt || Prompt.length < 5) return;
  AIextent.value = isExtend;
  loading.value = true;
  AIReply.value = ""; // 清空上一次的结果
  try {
    await sendToQwenAI(
      buildPrompt(Prompt),
      (text, isComplete) => {
        AIReply.value = text;
        if (isComplete) {
          loading.value = false;
        }
      }
    );
  } catch (error) {
    console.error("AI 处理失败:", error);
    AIReply.value = "AI 处理失败,请稍后再试。";
    loading.value = false;
  }
};

const handleApply = () => {
  if (AIReply.value) {
    emit('update', AIReply.value);
  }
};
</script>

<template>


  <a-popover :title="showTitle" trigger="click" placement="right" arrowPointAtCenter="true">
    <template #content v-if="description && description.length > 4">
      <div class="ai-controls">
        <a-button type="primary" @click="handleAiEnhance(description, false)" :loading="loading &&
          !AIextent" :disabled="loading && AIextent">
          AI 润色
        </a-button>
        <a-button type="primary" @click="extend && handleAiEnhance(extend, true)" :loading="loading && AIextent"
          :disabled="loading && !AIextent">扩展方向</a-button>
      </div>

      <div class="ai-content">
        <a-spin :spinning="loading">
          <div v-if="AIReply" class="ai-reply">
            {{ AIReply }}
            <div class="apply-button" v-if="!AIextent">
              <a-button type="link" size="small" @click="handleApply">
                <template #icon>
                  <check-outlined />
                </template>
                应用
              </a-button>
            </div>
          </div>
        </a-spin>
      </div>
    </template>
    <slot />
  </a-popover>
</template>
组件使用
使用起来就没什么难度了,直接传递一下提示词以及插槽的内容即可,十分方便快捷!
            <!-- 项目简介 -->
<AIEnhancePopover :description="`请帮我润色和优化以下内容,是我简历中的项目简介
   使其更加简洁、专业和吸引面试官,不用md语法,
   层次清晰分明:${project.briefIntroduction}`" :extend="`下面这个是我简历中的过往项目简介,我可以从哪些方面扩展优化?给我一些思路:
   \n${project.briefIntroduction}`"
   @update="(content: string) => project.briefIntroduction = content">
  <a-textarea v-model:value="project.briefIntroduction" placeholder="请输入项目简介" addon-before="项目简介" rows="4"/></AIEnhancePopover>

评论 (0)